The three split-buying presets on this site run exactly the same engine. Only four things differ: tranche weights, entry trigger, profit target and time cut.
| Tranche weights | Entry | Target | Time cut | |
|---|---|---|---|---|
| A1 Conservative | 5·10·15·20·25·25 | −0.01% | 0.01% | 10 |
| A2 Standard | 10·15·20·25·20·10 | −0.01% | 1.5% | 10 |
| A3 Aggressive | 16.7 × 6 | −0.1% | 2.0% | 12 |
Here is what those four numbers produce over sixteen years of SOXL.
The results
SOXL 2010-03 to 2026-09, $10,000 seed, 0.1% each way, run continuously.
| Return | CAGR | Max DD | Trades | Win rate | Win/cut | Avg hold | Time invested | |
|---|---|---|---|---|---|---|---|---|
| A1 | 3,048% | 23.3% | −28.3% | 1,903 | 86.0% | 1636/267 | 4.0 | 64.3% |
| A2 | 13,760% | 34.9% | −42.2% | 1,897 | 80.8% | 1533/364 | 4.7 | 70.9% |
| A3 | 20,053% | 38.0% | −52.5% | 1,831 | 81.0% | 1484/347 | 5.3 | 74.2% |
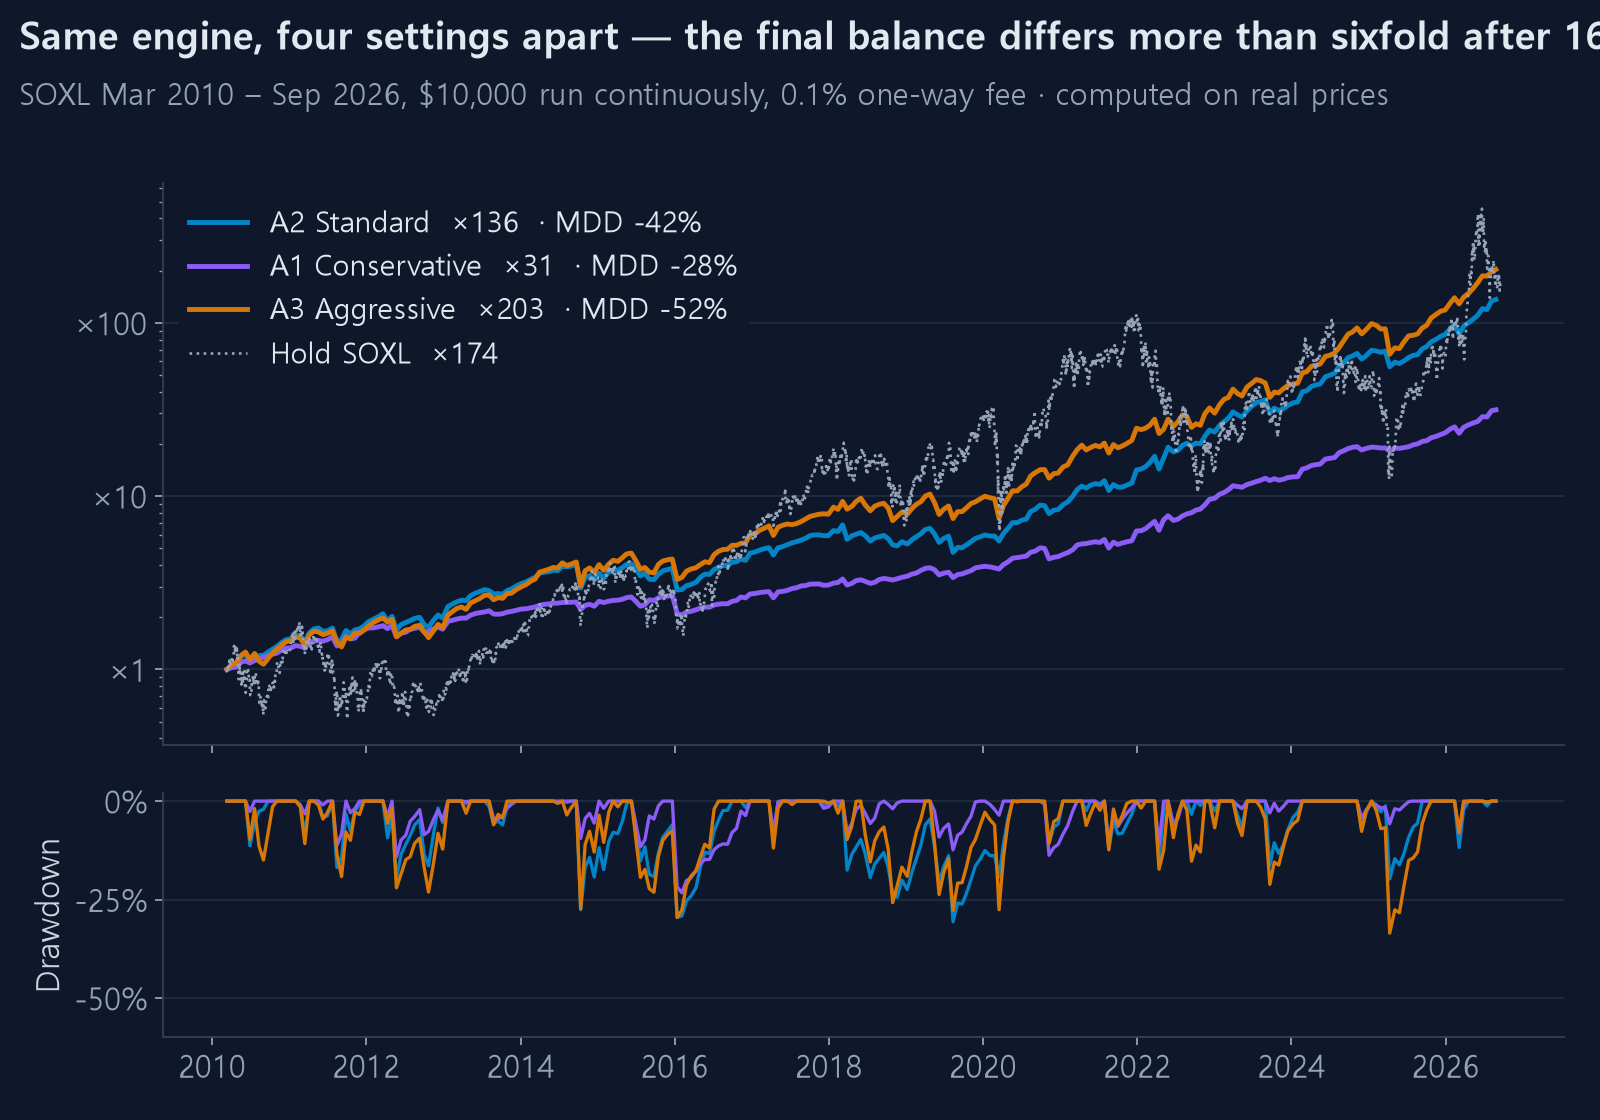
A 6.6x spread in final return, from the same engine on the same ticker over the same period.
What the weights do
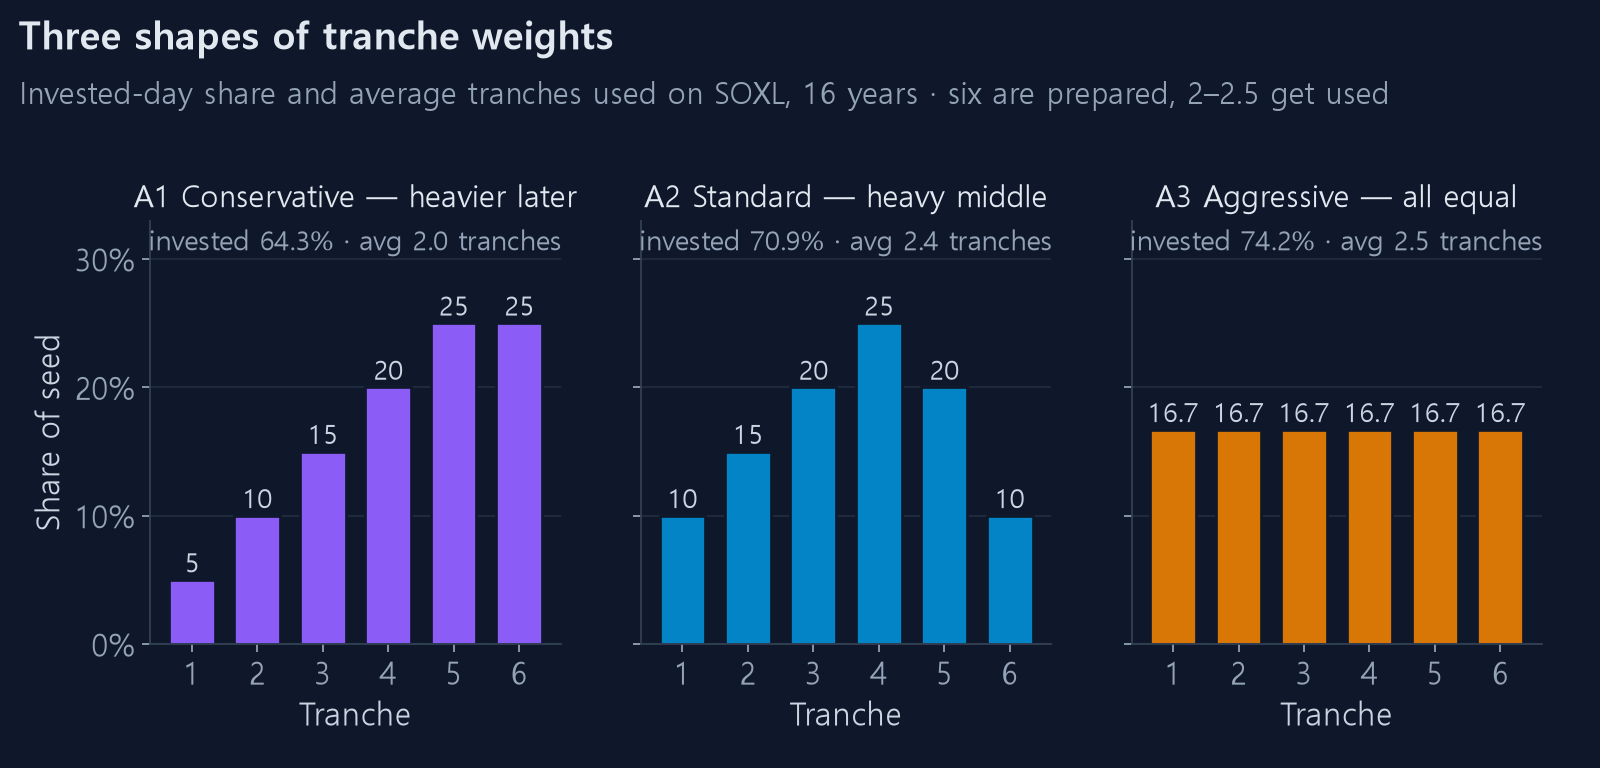
A1 — back-loaded
5 · 10 · 15 · 20 · 25 · 25
Only 5% of the seed goes into the first tranche, and each further decline buys more. It is built to pull the average cost down hard at deep levels.
The upside is real: little exposure early means a calmer account. Its −28.3% drawdown is the shallowest of the three, and across seventeen yearly runs it has zero losing years.
The downside is equally real. Most declines never reach 20%, so the large tranches never fire and the 5% first tranche does all the work. Most of the money sits idle — the 64.3% time-invested figure is exactly that.
A3 — flat
16.7 × 6
Every tranche identical. The first one already commits 16.7% of the seed, so the account is heavily exposed from the start.
Highest return, deepest drawdown (−52.5%). It completes only 521 cycles, meaning it tends to use many tranches and stay underwater longer, with the highest average tranche depth at 2.5.
A2 — fat in the middle
10 · 15 · 20 · 25 · 20 · 10
The biggest weight sits in the middle. It enters lightly, concentrates capital in the most common decline range around tranches 3 and 4, and tapers the last tranche again to keep something back for a genuine crash.
It is the most balanced of the three, which is why it is the default.
The profit target matters more than the weights
The largest single driver is not the weight schedule — it is the profit target.
A1's target is 0.01%, which effectively means "sell as soon as the price is above cost at all." That is why its win rate is 86%, the highest of the three. It almost always wins.
The problem is that it wins tiny amounts. On a day when a 3x product gains 10%, A1 takes 0.01% and leaves. An 86% win rate and last place on return are the same fact.
A3 targets 2.0%. Lower win rate at 81%, but the wins are large.
Win rate tells you almost nothing about a strategy's quality. Lower the target and the win rate goes wherever you want it.
Entry trigger: −0.01% versus −0.1%
Only A3 uses −0.1%, meaning the close must be at least 0.1% below the prior close. The others fire on 0.01%.
The gap looks trivial but shows up in trade count: 1,831 for A3 against roughly 1,900 for the others. It filters out near-flat days.
How to choose
On the numbers, A3 wins. The real question is whether you can sit through its −52.5%. Continuing to buy by the rules with the account halved is one line in a backtest and extremely hard in practice.
If there is one rule for choosing, it is this:
Decide the drawdown you can live with first, then pick the strategy that fits it.
Choosing a return target first and promising to accept the drawdown usually ends with the rule being broken at the worst moment — and the moment you break the rule, every number in the backtest becomes meaningless.
Try it
All four values are editable in the Split-buying parameters box on the backtest page. The box includes a comparison table of the three presets so the differences are visible at a glance.
A good order to experiment in:
- Change only the profit target — 0.5, then 1.5, then 3.0. Biggest effect by far
- Then the time cut (why the time cut exists)
- Weights last. They matter less than you would expect
After any change, shake the value ±20% and check the neighbours still look sensible. (Good parameters sit on a plateau)